Projects

Showing posts with label Victoriana. Show all posts

Thursday, January 15, 2015

Bonus Round Entry 3: Victorian Cyclist


The third theme round was Victorian. Now I had quite a few options for this one since most of my 15mm stuff could have fit in that category. But I really wanted to do someone riding a pennyfarthing. The problem: I don't have a miniature for that and I've already decided to try to do the Challenge without buying any new minis. The solution: brought about by the suggestion of my wife who shares my fascination with high wheelers, to sculpt my own.

Sculpting progression. I meant to take some more pics as he progressed but as usual I forgot.

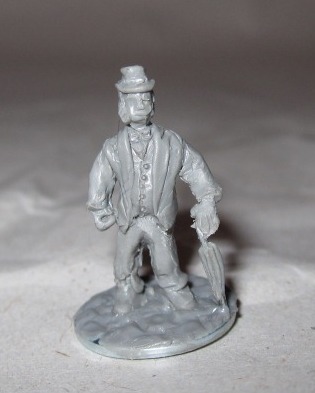
I started by finding a picture to use as reference and then working out an armature to start sculpting on. He wasn't really designed around any scale just off the picture once printed out. After measuring he is about 54mm, which has worked out to a nice scale to work in. All in all the sculpting took most of the two weeks but by far the most difficult part was making the bicycle. A couple of things didn't turn out exactly as I envisioned, and there was a good bit of trial and error in there to get a finished product. Also quite a bit of swearing especially in the construction of the front wheel.

While the pose matched the reference, I gave him a new outfit.
If I was doing it over again and didn't have a time limit this time I would figure out a better solution for the wheels first and go from there. As a self critique I think my usual flaws are still in evidence with this guy, mainly face, hands and proportions. The moustache hides alot of the flaws on the face and the painting some on the hands but his head still looks a bit small to me and his upper arms are too bulky. On the plus side I think my technique is getting better and the rest of the body is in good proportions. Using a good reference was a big help there.


Once sculpting was complete painting was pretty quick. The bike was done in blue to honor my first bike when I was younger. The rest of the color selection went from there. I wanted to do a fancy patterned waistcoat but after a first failed attempt I realized I wouldn't have the time to do it justice. After painting 15s recently doing a larger figure like this is quite a pleasure. You get alot of canvas to work some subtle blends in without driving yourself crazy. Not a scale I would game in but one I will be coming back to for modelling.

 
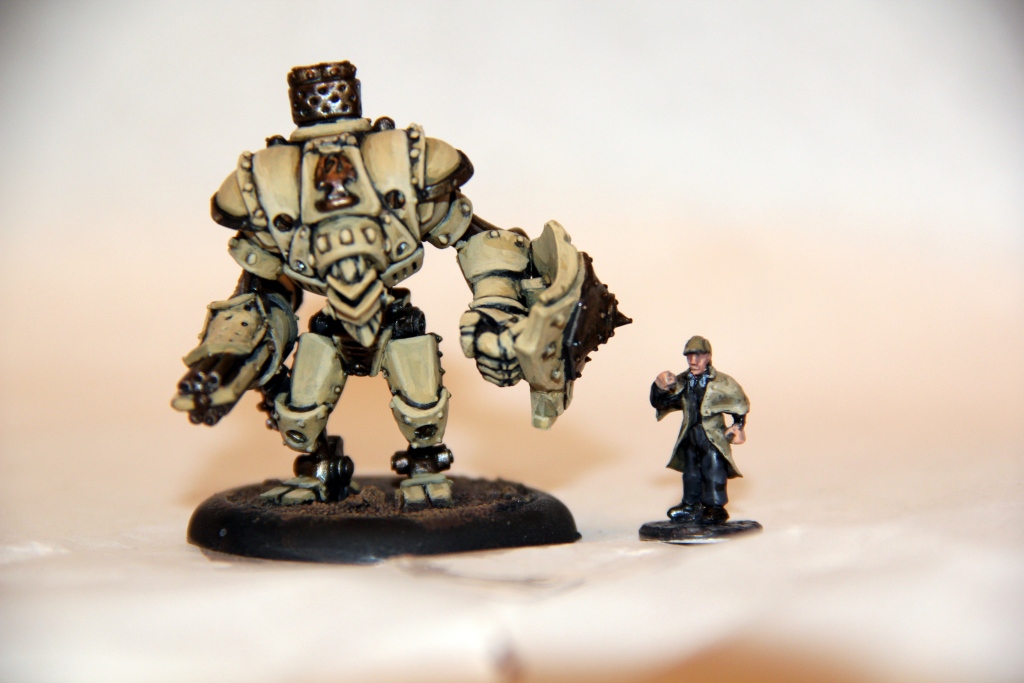
I don't usually talk too much about the photography but I'm really happy with the way this one came out. I don't have any terrain to scale to go with a larger figure like this so instead used my usual 15mm terrain. I pushed it to the far back of the photobooth and made sure my camera settings would blur it out into the background. As usual special thanks to my wife for the assistance with post processing.


Wednesday, July 30, 2014

Old Bob Codger

And some thoughts about Victorian roads.

Old Bob Codger has a history of taking almost any job as long as it pays.
Another character from Highlander's adventurers pack. He's been sitting half finished for over a month now but I finally got the few minutes needed to finish him off. I wanted Bob to look like a down on his luck street person but still armed and dangerous. So I aimed for an old faded suit with more than it's share of dirt stains on it.

Perhaps he shouldn't of stolen from the local "charitable" organization!
I also sculpted my typical cobblestone pattern for his base. But I've been looking at some period pictures like the ones below and I've begun to wonder how accurate it is. All pictures are from Writers in London in the 1890's Blog, which is a really nice reference and an enjoyable read as well. I've used a few to illustrate but she has plenty more. Some of these are Paul Martin street scenes, which you can also find with a search and I've found invaluable for reference.

Cheapside in 1892 the road surface looks almost like packed dirt.
Probably less traveled roadway with clear cobblestones but the gap between the stones seems to be filled flush.
Also being a porter back then required excellent posture it seems.
While the streets have well defined raised curbs and the pavers are clean,  the actual roadway is suspiciously flat and rather rutted. At first I wondered if they had been resurfaced with macadam. But further examination leads me to believe it's cobblestone covered with a layer of dirt, refuse, animal droppings, etc that's obscuring the stone and giving a flat appearance. I wish I could find a good resource on when roads made the transition to newer materials as it would hopefully be definitive one way or the other, but so far no luck.

A painting which shows the roads a dirt brown but it also looks like cobblestone at the edges.
Here we can see the same effect at the edge of the street. Dirt seemingly covering cobblestone.
Those kids are so full of character that they practically are begging to be sculpted up.
I think for the time being I'm going to keep going with the way I've been doing my roads, if only cause I like the way they look. However it would probably be more accurate to just cover them with sand and paint them brown. I'm not going to be afraid to be more generous with my wood putty filler over the cobblestones and add more brown to the streets. It'll have the added benefit of breaking up the gray and keeping it from being monotonous. I'll also have to try to replicate the gutter on the edge of the roadway and the pavers as well. Looks like some experimenting is in order.

Thursday, May 8, 2014

Bullseye O'Rourke

It's been far too long since my last post and I'm not really sure where the time went. I've been picking away at a couple of projects but nothing too completion unfortunately.
Bullseye O'Rourke armed with his custom made Sharps Big 50 rifle.  
To avoid ignominy of not having anything done for so long I painted up one of the characters I had previously picked up. I think he's from the Rebel miniatures steampunk pack. Hopefully I can get a few more small posts in and get back in the hobby groove. 


Checking in with the locals.

I dressed him up a bit with a tartan waist coat. He also has some five o'clock shadow but not sure how well that came out in the pictures.


Monday, December 30, 2013

Worcote Hall


As the year comes to its end I've finally finished the last of the buildings for Lower Fickleham. Not to mean that I don't intend to continue to make new buildings for the town just that this is the last of the original Crescent Root buildings. Saving the best for last, or at least the largest, we have Worcote Hall. Probably some old manse of minor nobility. I imagine that he was the first one to plaster up all of those walls in the new Continental style and the rest of the town followed suit. Now everyone is sort of regretting the decision and the rendering is chipping away here and there.


I followed the same paint scheme as the rest of the town but kept the building slightly cleaner. I left the windows dark as I really couldn't find any good examples of country homes with bright paint on them. I think it gives it a very somber appearance anyways. I also tried my hand at adding some ivy to the back.


Sunday, April 22, 2012

Windows and Doors

Over the past weekend I was able to get some more work done on my architectural bits. I decided to do three different types of windows and two doors. I figured this would give me a bit of variety when putting together a few buildings. I also think I'm going to do wall sections, roofs pieces, chimneys, and other detail pieces. Then I can cast up a bunch of pieces and just mix and match them together to make several buildings. Of course this means it will take longer to get the first building done but after that I should be able to knock a couple of them out quickly.


I still had some mold making material left so I was able to make a mold. Unfortunately, I don't have any casting resin left so I'm going to have to order some more. I'll get some silicon mold material too while I'm at it cause I'm going to need some soon enough.

In the meantime I found a resin 15mm building ruin that I think its meant for eastern front WWII, but will work well enough for what I'm doing. I'm going to paint it up and use it in the background for pictures.

Sunday, March 4, 2012

Architectural Details

I need to start making some terrain to go with the Victorian 15s I've been working on. The problem is that buildings at that scale aren't that easy to make. Victorian buildings have a lot of detail to them and replicating it at that scale can take a lot of effort or money to buy HO scale details.

My plan instead is to make castings of details for myself. I've done this before when making buildings for Warhammer 40k. Though those pieces were obviously larger and easier to make.

One of the windows I cast.
And the same window used three times together.


On my list of pieces to make are doors, windows, shingles, and probably stone walls. I might do some cobblestone sections to for roads, sidewalks, etc. Still debating on doing chimney parts or just making them as I go. The advantages of all of these are that they can be made with a one piece mold, which are far easier and cheaper to make.

A set of steps and shingle patch with a Prussian for scale.


With these parts I can cast up pieces to make more complicated pieces. Dormers come to mind as combined with mansard roofs they are pretty typical of late 1800's architecture but fiddly to construct each time. This kind of thing would require a two piece mold though. I could cast each face separately but then I would have to deal with assembling it. It would allow me to mix and match pieces though. I'll have to play around with some mockups and see which way I want to go.

Wednesday, February 22, 2012

Inspector Collins

Overall, out of all my sculpts so far this is the one I'm most satisfied with.

Inspector Patrick Collins has always been the odd man out at the Yard. Promoted from constable after finding the kidnapped Lady Byron, and taking a bullet in the shoulder for his troubles, he has never really been accepted by his comrades. It's no wonder then that he has has been assigned many of the bizarre crimes that have been occurring in London. Certainly not thrilled by the assignments he is too much of a professional to not devote his full capabilities to the so called U cases. 


Monday, February 20, 2012

Mrs. Amelia Pelham

Many distractions and delays later I finally finished the Victorian Lady. I'm happy with her face but hands are still my downfall. I thought I would start adding a small story about each figure that would help breathe some life into both the figures I'm making and the larger world I see them fitting into. Most of this I make up as I'm sculpting. It keeps me interested and motivated to finish them. After all it is easy to stop creating some random sculpt but much harder to finish work on the imperious Mrs. Pelham. 

Wife of Reginald Pelham, owner of Pelham Dry Goods And Mechanicals, Amelia Pelham is one of many middle class women very much involved with the spiritualist scene of London. Here she is hurrying to a seance with the renowned medium Antoli Keerard with little concern for what the neighbors think. And certainly none for what Mr. Pelham thinks. 


Sunday, January 29, 2012

Call Scotland Yard!

Still working on sculpting. I started some more steampunk figs but they aren't really far enough along to show any pictures yet. But I do have three of my previous sculpts coming into the home stretch.

The first is the Victorian lady that I started in the first batch. Her dress is mostly done but her face is giving me troubles and I've redone it multiple times. Currently she is in between faces, hopefully to be corrected today. 


Next up I wanted to do a classic Victorian constable. I like this guys face but the hat needs some work and I'm afraid he ended up being a little on the large size. Also his pose isn't exactly what I planned but I'm not sure where it went wrong.


Finally, the inspector. I wanted him to look like a Victorian version of the hard boiled private dick. Hands in his pockets and hat pulled down low. This face definitely is coming off and of course his bowler needs to be added afterwards.


Overall, I'm happier with these three than the previous three so I'm making progress. I'll post some more pics when these get finished and the next trio are further along.

Tuesday, January 24, 2012

More Victorian Sculpting

Looking at my pictures from yesterday I can't help but notice the flaws. I think this might be because the pictures are enlarged letting me see much greater detail. This has given me the idea of trying to use a magnifier when I'm working on these guys particularly the faces, hands, and other details. I also want to work more detail into their pants and try to avoid that seam line on their inner legs.


In the meantime I finished off my street tough/ pugilist. I'm happier with both the face and hands on him but I feel that there is definite room to improve. Finally a pic of all three of my completed Victorians together.


Monday, January 23, 2012

Sculpting Update

Still working on my 15's. This past couple of weeks my hands dried out and started to peel turning into lizard hands as my lovely photographer put it. Kinda slowed me down since it was like sculpting with leather gloves on. Tough doing detail work and really hard handling the putty. They are mostly better now so hopefully I can finish off some of the guys that are almost done. I've got ideas for a whole bunch more. Also thinking about picking up some 15's from Black Hat or Blue Moon. Both of which look like they would fit in pretty well. I'd like my guys to match what is already out there.


Here is the gentleman completed. Not completely happy with his face or hands. The size makes the fine work like that pretty difficult. Not sure if I need to change my technique or even my tools for working on them or just more practice. Hopefully the last!

Thursday, January 5, 2012

Forced Perspective

I thought I would illustrate what I meant a couple of posts ago when I was talking about forced perspective. Just playing around with what I have on my work desk I wanted to show the adaptability of a model like the Privateer Press warjacks. Since they don't really have any clear clues to what size they are they are scale neutral. ( At least from the front. On the back there are gauges and the fire box door to give the scale away a bit more.)


So what does that mean? Well if you put him next to a 28mm figure then he looks like a big robot.

Dr. Oculus and his trusty autonomous companion?
But if you put him next to a 15mm figure then he looks like a 50' tall giant robot or mecha. Far more impressive!
A detective and his steam driven mechanical war machine!
If you add in terrain scaled correctly it works even better. Hopefully I can show some pictures of that in the future.

Monday, January 2, 2012

15mm Victorian Sculpts 2


Here are some pics of the Victorian 15mm guys I've been working on. Normally, I prefer Greenstuff for sculpting but my supply is getting a little low so I decided to use some Procreate that I had laying around. I wasn't thrilled with the feel of it when working in larger scales but the more clay like properties works for this smaller scale.

                                               Classic Sherlock Holmes almost complete.

                                                                Street Tough/ Boxer

                                                       Portly Gentleman/ Classic Watson


                                                                        Victorian Lady


Related Posts Plugin for WordPress, Blogger...