Projects

Showing posts with label Sculpting. Show all posts

Monday, March 14, 2016

Return to the Blog


Well its been 6 months since I last posted on the blog. There isn't one cataclysmic cause but instead the usual slow creep of many small things caused me to move my focus away from hobby related pursuits. But the biggest is probably the butterfly effect. I'm not referring to Chaos theory but instead the tendency to flitter from one interest to another.

Rofous Hummingbird
The stem he is sitting on is sculpted, the slice of maple that forms the base is from a fallen tree in my backyard


I think we can all relate to butterfly effect in our hobby. Few of us have the single minded focus and willpower to work thru and complete projects before moving onto another. I tend to move around between various genre and individual projects leaving partially completed models behind in my wake. Sometimes I come back to finish them up sometimes they languish for years gathering dust.


Blue Jay bust

In this case I've been working on sculpting projects just not the usual  miniature ones. My wife and I have a side business selling bird sculptures. She does needle felting and I mostly work in polymer clay. For the past months this is where most of my creative energy has been going.

Evening Grosbeak

I know that most people following a miniatures blog probably don't share my particular interest in bird sculpture so I've only posted a couple of projects here and there in the past. But I also decided to put up a few pictures of my recent favorites.

Boreal Owl
So that's what I've been up to and in the next post it's going to be what I'm working on now.

African Penguins

Thursday, September 10, 2015

Jimmy Fishhead


I still haven't managed to get the perfect storm of time, lighting, and weather to take better pictures of my boards but in the mean time I've finished up my sculpt of Jimmy Fishhead. I took some pictures of him in my wife's new Foldio lightbox. 


It's very nice to use but I still need to play around to get a better light balance as the grey putty against the white background can make things difficult. 


I've also done some other sculpting of the avian variety. My snowy owl has been completed and I'm trying my hand at more stylistic ( and I'm told by my wife cuter) little birds. We have three shows coming up in the next few months so I need to crank out some birds to stock the tables. 

Snowy owl 

Black Capped Chickadee even rounder than in real life

Wednesday, August 19, 2015

On the Workbench


In an attempt to get into the swing of posting more regularly I've decided to try showing what I'm currently working on. Aside from the terrain boards I've also been trying to get back into the rhythm of sculpting again. 

I am definitely a hobby butterfly and have a tendency to move from one project to another. Although I guess I'm rather like a Monarch in the fact that I tend to come back to the same projects again and again. The problem with sculpting is that  I'm far slower at sculpting than I am at finding new things I want to work on. This has led to starting many sculpts and then abandoning them as I lose interest and move onto something else. As a consequence I have a whole box of partially finished sculpts ranging from nearly done to barely started most of which I have no idea what I originally intended them you be. So I thought it might be a good exercise to try to make something of them. No real plans on what they will end up being just whatever strikes my fancy.

The box of orphaned sculpts
First out of the box was a rather pudgy fellow that was little more than a bulked out  armature. I was thinking maybe an alien merchant with robes like something out of Star Wars but then my wife said " Give him a fishhead!" and later "How about a gangster suit." And so Jimmy Fishhead, mob enforcer was born. 

Here he is to start. To give you an idea how long he was sitting around I switched from using greenstuff to Procreate to sculpt with about 6 years ago. The head went on first with a pair of generic dress shoes. 


Here is where he is right now mostly suited up. I wanted to do a classic double breasted suit but misplaced my first button. Oh well Jimmy likes the freedom of movement with a single breasted jacket. 


I'm also working on a tommy gun for him. I find doing hard surfaces like this difficult so I'm taking my time with it. Hopefully Jimmy will be done and off the work bench by next week. Then it will be onto the next draw from the box of orphaned sculpts. 


Sunday, May 31, 2015

Possessed Civillian


This is one of the figures I didn't quite get done in time for the painting challenge now two months gone. I wanted to make a figure to show someone who got a bit too close to extra-dimensional powers and hasn't come out the better for it. He was sculpted up from a basic armature and then I just added a whole bunch of tentacles to him.
In progress shot, tentacles are just starting to grow. 
The nice thing about making your own figures is that you don't have to worry about casting limitations. In this case I was just able to add tentacles going all over with a lot of void space to give the impression of the figure being completely supported by the tentacular mass that he has for a head now.  
Side view

Sculpting is all done and he's prepped for painting.

Out and about menacing the neighbors. 
He painted up really fast as I went with a simple scheme. I tried to make the tentacles a similar color to the Shoggoths that I painted some time ago. Perhaps he's half transformed into one? The frock coat and pants are just a basic brown to contrast with the purply grey. For the skin tone for the hands I went with a pale sickly fleshtone.


  My plan is to fit him in with the Cabal, my evil faction. Maybe an experiment gone wrong or right?
 I might try to make a couple of my troopers as minders for him. I'd like to give them some sort of cattle prods or the like to direct him in the right direction.

"Who me,  Officer?" 
So it's been two months since my last post. The usual assortment of excuses I'm afraid mostly centered around several life changes. Hopefully I'll be able to get back in to regular posting schedule again as things have settled down somewhat. Finishing up my modular gaming boards are the next big project and I still have a couple of other figures that are leftover from the Painting Challenge as well.  

Sunday, March 29, 2015

Something Different: Owls


Somehow two of my hobbies have managed to run together. Both my wife and I are birders and also volunteer with a bird rehab organization. Part of the reason for this stems from our love of birds and owls in particular. Last year my wife started a new hobby of needle felting small birds and again in particular owls. She has also started a sideline of selling them on Etsy. ( You can check it out here at Birds By Botzan.) I have helped her out with parts of her projects before, mostly making armatures and constructing feet and beaks for some birds.

Saw Whet owl found in Canada
Then she asked me to try my hand at sculpting some owls for her after seeing something similar online. I decided to try to use Super Sculpey for this project. I've made some terrain and architectural details with Super Sculpey before but never any real detailed sculpting. I also used premade glass eyes for the sculpts. These are worth their weight in gold for really making the figures come to life.


The first one I did was a Saw-Whet Owl based vaguely off a picture I took of one last fall in Canada.
He was basically a learning experience with how to work with the Super Sculpey. After he was baked and hardened I also painted him up.


The second is a snowy owl. A while ago we had purchased a pair of books about making wood carvings of owls. These were an invaluable reference as they have tons of excellent drawings and scale references. He still needs to painted but I think he is a big improvement over the first little guy.


28mm figure I dug out of my collection for scale. Not meant to be giant ferocious owls but they could work in a pinch. 

Friday, February 13, 2015

Sicktime Sculpting Projects

I suffered through a case of the man-flu this past weekend which threw my plans into disarray. I didn't get to submit my entry for the Hot bonus round and since I'll be on vacation next week it looks like I'll be missing the Comedy one as well. Disappointing but at least I should be able to submit the figure for the Hot round as a regular entry once I get around to taking some pictures.

18mm - The one on the left is going to be the first of my Great Victorian Writers Running in Terror series. On the right is almost done just the hard parts of face and hands to do.

I couldn't muster up the energy to do any painting this week but I did get started on a group of new sculpts in a variety of scales. I have vague ideas for uses for some of them but in general I'm just working on what I feel like right now.

Early stages of various pieces. 28mm on the left, a bust of indeterminate scale, and one scaled out to 1/35 as a trial run.

Thursday, January 15, 2015

Bonus Round Entry 3: Victorian Cyclist


The third theme round was Victorian. Now I had quite a few options for this one since most of my 15mm stuff could have fit in that category. But I really wanted to do someone riding a pennyfarthing. The problem: I don't have a miniature for that and I've already decided to try to do the Challenge without buying any new minis. The solution: brought about by the suggestion of my wife who shares my fascination with high wheelers, to sculpt my own.

Sculpting progression. I meant to take some more pics as he progressed but as usual I forgot.

I started by finding a picture to use as reference and then working out an armature to start sculpting on. He wasn't really designed around any scale just off the picture once printed out. After measuring he is about 54mm, which has worked out to a nice scale to work in. All in all the sculpting took most of the two weeks but by far the most difficult part was making the bicycle. A couple of things didn't turn out exactly as I envisioned, and there was a good bit of trial and error in there to get a finished product. Also quite a bit of swearing especially in the construction of the front wheel.

While the pose matched the reference, I gave him a new outfit.
If I was doing it over again and didn't have a time limit this time I would figure out a better solution for the wheels first and go from there. As a self critique I think my usual flaws are still in evidence with this guy, mainly face, hands and proportions. The moustache hides alot of the flaws on the face and the painting some on the hands but his head still looks a bit small to me and his upper arms are too bulky. On the plus side I think my technique is getting better and the rest of the body is in good proportions. Using a good reference was a big help there.


Once sculpting was complete painting was pretty quick. The bike was done in blue to honor my first bike when I was younger. The rest of the color selection went from there. I wanted to do a fancy patterned waistcoat but after a first failed attempt I realized I wouldn't have the time to do it justice. After painting 15s recently doing a larger figure like this is quite a pleasure. You get alot of canvas to work some subtle blends in without driving yourself crazy. Not a scale I would game in but one I will be coming back to for modelling.

 
I don't usually talk too much about the photography but I'm really happy with the way this one came out. I don't have any terrain to scale to go with a larger figure like this so instead used my usual 15mm terrain. I pushed it to the far back of the photobooth and made sure my camera settings would blur it out into the background. As usual special thanks to my wife for the assistance with post processing.


Wednesday, August 13, 2014

Finishing Things I Started

Its funny how some projects get abandoned and languish forever and then you get a moment of inspiration and you finally finish them off. Well this one isn't quite finished but it has surely waited for quite some time. It started simply. Get some cool Khurasan scifi guys and remake them as steampunk foot soldiers. That was way back in November of 2012 and I really didn't think it would be a big deal. Then I ran into The Problem. In this case it was making the fancy steampunk rifle to replace the stock AK-47 style one they had. I went through a couple of unsatisfying options before I ran out of interest and it got pushed to the side.

The sculpted rifle and backpack ready for molding.

I came back and played with it a couple of times each time giving up without much progress. Finally, driven at least partially by my self imposed time table to finally play a game, I settled on a design I liked. A week of frustrating sculpting, and another few days of trying to get the mold to actually cast right, I have a finished product.

Sketch I made for the rifle design. It kinda looks like a Games Workshop Imperial Guard Lasgun now that I look at it.


I'm going to try to paint one up quickly since I'm really hoping they turn out the way I envisioned.


I think the rifle turned out a little too big really. I didn't notice that the Khurasan mini is more of a true 15mm as opposed to the usual 18mm that most of the rest of my stuff is.

Apologies for the poor phone pics but I was rushing to get him onto the paint table.

Continuing my thoughts on Victorian roads from earlier I decided on a new basing style with patches of bare cobblestones and mostly dirt.


Thursday, June 12, 2014

Crates and Such

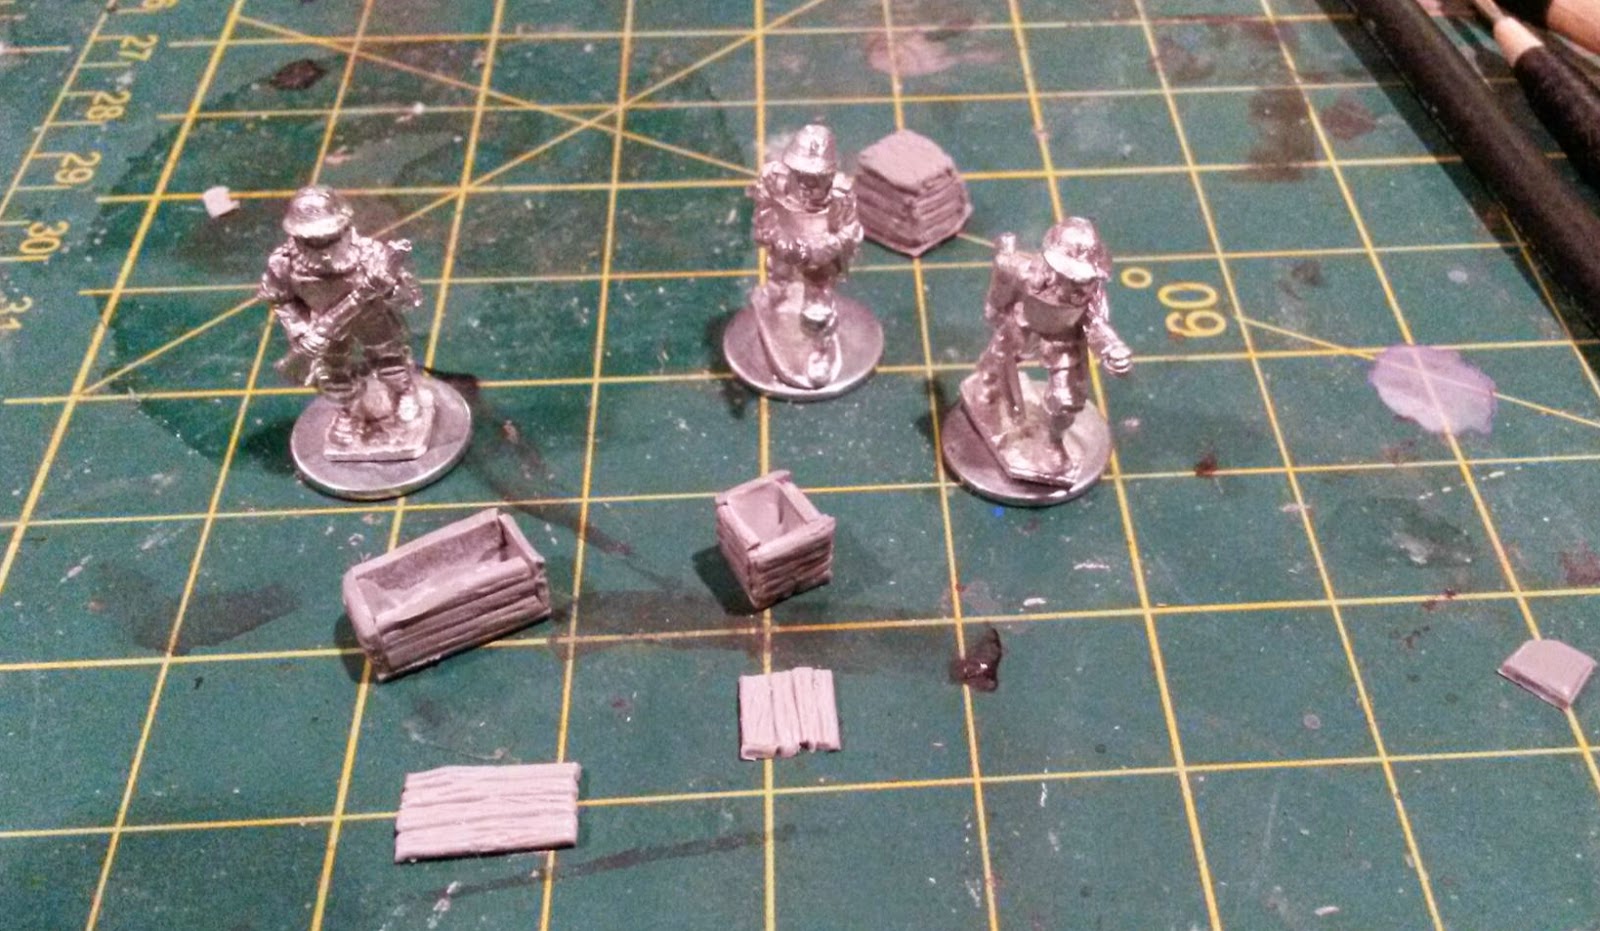
Not much happening with painting which means my queue is really stacking up with the new All Quiet stuff being added to it. I have been doing some sculpting though.I've been using leftover putty from other projects to make some odds and ends. My first idea was to make some various crates, stowage, and other items to use as street dressing and for an eventual warehouse.


My first crate was a bit of a mess. I just slapped some putty on around a rough cube cut from some cured putty. It looks like the carpenter was having a really bad day or let his kid make it. I'll probably just stick it in the center of a pile of other stuff to disguise it.

Next up I decided to rethink my construction technique. This time I rolled the putty out to a uniform thickness and then sculpted detail on while still flat. Then I glued the parts together. Much better, so I made a second one as well.


For a future warehouse I'll need many more so I'm going to try to make a mold of these to duplicate them. I reinforced the inside of the crates with some putty and then at the last moment decided to make separate lids. This way I could have some open ones with goods inside them.

Three BEF infantry from All Quite inspect the new crates. Perhaps hoping for a selection of nice cheeses inside?

 Next step mold making!

Related Posts Plugin for WordPress, Blogger...