Projects

Showing posts with label Rutger Farmstead. Show all posts

Thursday, January 31, 2013

Barn Storming?

I've been able to make some progress on the barn although not as much as I would of liked. Some poor planning on my part has forced some changes in the design. First, I've switched to swinging doors. I couldn't figure out a good way to slot the doors in to rails without making the whole assembly far to thick. The doors aren't finished yet since I'm waiting on some thinner basswood to complete them, but I'm going with a simple wire loop and piece of wire to use as a hinge. Also due to the hayloft covering half the barn I needed a crossbeam in the middle of the barn. That would of put it right in the middle of the doors so they had to be moved over and a new piece cut for the front. Old Man Rutger should of fired his architect!

That's the hayloft floor in the lower right.
Second, in order to put the hayloft on I needed to start painting the lower level. I first brushed some wood filler randomly across the floorboards as dirt and such. Then the interior got a coat of brown paint and worked up from there. I almost forgot to paint the bottom of the hayloft and put in the rest of the supports too, but remembered right before I was going to glue it in. Once it was in I kinda wished I made the side doors openable too as its more than  a little dark inside.

Hayloft floor glued in and some support beams glued to the underside of the overhang.

I also built a little shed thing onto the front of it to give a little more interesting layout. I saw a similar thing in a picture of a American Civil War era barn. I figure it's probably a tool/junk shed like you see on most farms.

The shed out front with the old roof just before I decided that I didn't like it anymore.
Side view showing off the shed door and the overhang area.
I framed out the roof but the more I looked at it the less I liked it. So back to the drawing board there. I have a good idea how I want to due it but its going to be a time consuming and fiddly job that I haven't psyched myself up enough to complete. So that leaves me with finishing those doors, the roof, and the rest of the painting.


Monday, December 31, 2012

Down on the Farm with Fritz

I realized I hadn't taken any shots of the farmstead with figures. That was sort of the whole reason for making it, to give some scale for the miniatures I had finished.


One thing I ran into with the tile board was that the magnets in the trees I made aren't strong enough to grip through the thick vinyl. So I ended up making a few small metal pieces to use as bases for the trees. I did them basically the same way as the board but I picked up some different turf colors to mix in as well.


I'm kinda going around in a circle on the bases with terrain. It just seems faintly ridiculous to make a base for a tree, that was made to not need a base, so it will stand up on the board. I might need to rethink this whole basing thing. While I like the baseless concept, at 1/100 scale I'm not sure how practical it is. I've already used small, partial bases on the buildings I made to protect some of the more fragile parts. I'm thinking something similar would work with the trees as well. I might be able to get away from the thick trunks then and keep it more realistic looking, which was the original goal anyways. I'm gonna keep experimenting but I expect I'll be going with more bases in the future. 

Monday, December 17, 2012

Laying Some Groundwork

A little while ago I started work on a simple section of board to take pictures of my farmstead on. It didn't go so well. It just wasn't flat enough for the house and other terrain to sit on nicely. So I decided to take another approach. I borrowed an idea from Spacejacker over at Tiny Solitary Soldier and picked up a simple vinyl tile at a local hardware store. Its a foot square and I looked for one that had the most surface detail. I sprayed it black and dry-brushed it up through brown in the recessed areas.

Next I layed down some ground scatter across all of the areas that I wanted to get covered with grass. I used the same fine turf that I've used previously on the trees.

I forgot to take a picture of the tile after just the dry-brushing. Here it is with the turf applied.


I've always had a problem with the turf wearing away in the past so I experimented with soaking the whole board with a mix of watered down glue. I also wanted it to act like an ink wash so I mixed a little paint into it as well. I applied this with a pipette so it thoroughly soaked all of the turf.

While still wet I also put some glue directly on in spots and then hit this with some static grass clumps. I sprinkled more static grass around as well. 

Just after I put the static grass on and still soaked with glue.
Coming back the next day I saw both good and bad. The turf was attached very solidly so that worked out well. The paint in the mix though didn't act so much as an ink-wash as it just colored all the turf a similar color. It also left distinct edges anywhere it didn't get too. Not a total loss though. I dry-brushed some greens and browns on to blend things together and give some more definition.


 Room for improvement but I think it turned out fine. I'm considering getting 4 more and making a quick and easy board to play on.


Sunday, December 2, 2012

Good ol' Fashion Barn Raising

Well to be more accurate its a barn assembly but close enough. I've gotten a good start on the barn. I saved it to later because going into it I knew I wanted to try out a couple of more complicated ideas with it.

Pieces for the sides cut out.

First, I wanted a removable roof since its big enough to fit a fair amount of guys in there. This meant the walls would have to be pretty strong on their own without the reinforcement of the foamcore center that all of my other buildings have. It also means a detailed interior. Luckily barns are pretty open so that won't be too bad. I decided to carve wood  planks into basswood for the cladding and use some more basswood strips as the interior framework. It won't be nearly as sturdy as the rest of the buildings but I don't treat my terrain too roughly either so it should be OK.

Internal framing. Now that's a barn that's not going to fall down!

I also want to make the main doors open-able. Mainly because I think it would make for a great picture of a monster or robot pushing them open as it stalks forward from the gloomy depths of the barn. I'm still playing with the best way to attach them. Since I'm patterning the barn more or less on local ones here in Western PA I've decided on using New England style sliding doors as opposed to the English style swinging ones. I've also had better luck with sliding pocket doors on buildings as opposed to hinged doors.

Backside showing off that fine panel work.
First tile strip done.
 I also completed my first strip of roofing tiles sculpted out of procreate. Once I get a few more done I'll get a mold made and start casting them. I'm going to need a lot of tiles to cover that big barn roof!

Tuesday, November 27, 2012

Someplace For All My Chickens

Still working on the conversion parts for my Cabal guys. The backpack is coming along but the rifle is causing me problems.

In the mean time I've finished the shed I've been working on. A couple of sloppy mismeasurements led to some extra pieces being tacked on the front and side but overall I think it turned out alright. I'm thinking about making some tiny chickens to scatter about near the coop for pictures and playing.


Next up is the barn and I might also work on the hand-pump at the same time. I'm also thinking about some fencing and some field crops. I might reuse an old technique I discovered with caulking for the crops. I'll have to do some more research on period fencing before I figure out how I'm going to make that yet.

The farmstead is starting to come together.


Sunday, November 18, 2012

Take 'em Out To The Woodshed!


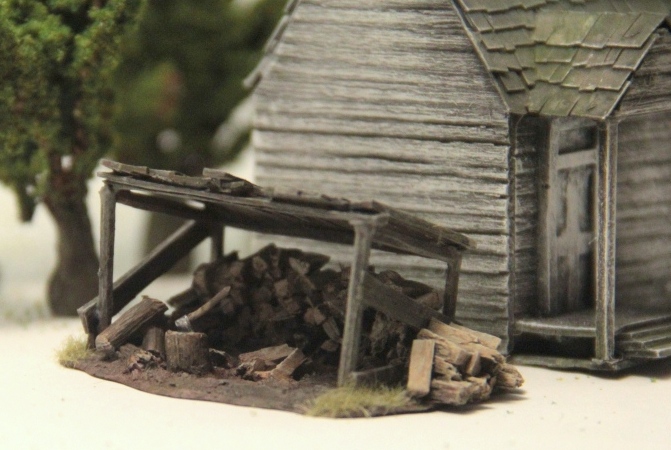
Finished up the woodshed that I've been working on. I have to admit that I'm pretty happy with this one. I based it off of a woodshed at a place I vacationed at up in Maine. Nothing fancy, just some boards knocked together to keep the wood dry and a stump with an axe out front to split it with.


Its mostly basswood strips and the firewood is made out of some sticks from the yard that I split with an x-acto knife. The stump is another chunk of stick and the axe is just a piece of wire stuck in it with the axehead sculpted out of putty. Finally, I finished the ground with some wood filler.

Painting was straight forward, I just wanted it to look well weathered and well used. I've found that I'm relying heavily on dry brushing followed by ink washes and glazes to get the effects I want.


I've also started on the other outbuilding. Still pondering the well as it should probably be a hand pump. Harder for monsters to craw out of that though. Finally, I'm hoping to get back to working on figures this week. I just got a package in the mail and I have some plans for the contents. More on that next time.

Wednesday, November 7, 2012

Rutger Farmstead

I decided to give a proper name to each terrain project I'm working on just like I've been doing with my miniatures. In this case the house is going to be the centerpiece of the Rutger farmstead (named arbitrarily after one of my favorite actors, Rutger Hauer.) While I'm sure in use I'll mix and match the various pieces it gives me a theme to work with.


 I had a hard time getting a color scheme on it that I was happy with. The walls and roof just kept ending up to close in color. In the end I hit the roof with some ink washes and dry brushed the walls up more to get a good contrast. All part of the learning curve when you start working in a different scale.


I can almost see old man Rutger standing on his front porch smoking a pipe. Maybe this year no giant monsters or robots will come along and wreck his back 40. Guess I need to find an Old Man Rutger figure now too.

Next up for the farmstead is finishing up the woodshed, starting on the barn and I want to make another outbuilding with attached chicken coop. Maybe a well too, need somewhere the gribbly monsters can climb up out of.

Sunday, October 28, 2012

Tiny Roofing Man's Blues

If there is one thing this project has taught me it's that I have no desire to become a 15 mm roofer. On a 28 mm building cutting the shingles is tedious but putting them on is actually kinda relaxing and fun. Not so at this scale. Each shingle is too small and fiddly for my sausage fingers to easily manipulate. I'm reduced to pushing them around with a sculpting tool and disliking every moment. I would cut them as strips but again they're so small that cutting them like that is going to be pretty horrible.
My basic technique is to scribe some guidelines on the roof and then glue the shingles on in courses.
I think the next thing architectural detail I'm going to do is make up some shingling strips and cast them in resin. Then I can use those to roof any future buildings. A little more work on the front end should save me a lot of work on the back end.

Finally, all done. The chimney was sculpted over foamcore base to look like field stone.
The back side of the house.

I'm hoping to get the house painted this week and some finished pics up then.

Saturday, October 20, 2012

Second takes, Second Year

A couple of setbacks with the terrain pieces. Using balsa and pressing the detail in just isn't working for the roofing. I tried a test piece and didn't like the level of detail or definition. I also tried painting it thinking perhaps some dry brushing would help distinguish it. Unfortunately the base coat soaked into the balsa and swelled it up returning it to virtually flat. Now I'm a little worried about the siding. Nonetheless, I'm pressing on.

I've started doing the shingles with thin card. I was trying to avoid it since cutting out the shingles is very time consuming and I've had bad luck with card warping in the past. After completing only one part I realized I'm being a little too slapdash with them. At this scale I need to cut my shingles more uniform in size then I would for a bigger model. Some of the shingles on there would be 3 feet across in real life!

Up front is the framework for a woodshed. I'm planning on a barn and another outbuilding to complete the farmstead.


On the plus side I've been working on this blog for an entire year now. I'm pleasantly surprised I kept it up all this time and the fact that I'm still interested in continuing it as well. What I'm working on has changed dramatically from what I originally intended but that is part of the hobby I suppose. I tend to get obsessed with something but move on pretty quick. So its surprising  that I've more or less been working on one project since Christmas of last year. I guess this whole steam punk enterprise is just the right combination of things to really get its hooks into me!

Wednesday, October 10, 2012

A House in the Country

With some trees done I knew I needed something else to go with them. Trees and to a slightly lesser extent rocks are pretty much scale neutral. Next to a 15mm figure a tree might be a mighty oak but the same tree seen with a 28mm figure looks like a scrubby little maple. So I needed two things to make everything work out.

First is something for my trees to stand on. I like magnetizing the trees since it allows them to both be positioned individually and to minimize the base so it looks like its coming straight out of the ground. The downside is you need to make a board specifically for them with metal built into it. So I made a small board mainly for taking photographs. Its sized to fit in my light box and the plan is to try to scale it to 15mm.

The board starts as just some insulation foam with bits of sheet metal glued to it.

Next a layer of spackling to smooth it all out.

Second I need a house. Buildings are the best thing for showing scale. There is a reason Godzilla is always stomping down main street in downtown Tokyo. I wanted my first building to be nice and simple so I can experiment with building techniques and not get bogged down in the details. I decided on a simple clapboard house with an addition and a little porch. I saw a picture of something similar in an American Civil War era photograph and I'm using that as my guide.

Basic structure put together and casting some details.
The basic structure is built out of foam core. I used some of my cast architectural details for the door and windows. I pondered how to do the clapboard siding and decided to use 1/32 balsa wood sheet. I cut it to size and then using a straight edge and a spoon buffer sculpting tool pressed in the board shapes. I glued these on the outside.
Started work on the front porch and laid down some plasti-card to form a base for the roof. The tool up front is the spoon burnisher used to press in the boards.

I'm thinking the roof is going be done similarly. I'm guessing it would either be shakes or slates in reality so I'm going to try to press the pattern into the balsa wood and see how that turns out.

Related Posts Plugin for WordPress, Blogger...